38일차
●38일차(20250208038.php)
#미션1. http://st.kr의 index.html을 수정하라
st.kr > /var/www/html > root
> root라 쉽게 접근이 불가능
> 서버에 접속해 직접 index.html을 만들어주자
cd /var/www/html
rm -rf index.html
nano index.html
[index.html]
#3대서버
nat > 10.0.2.15 10.0.2.2 168.126.63.1
# 서버 모니터링 시스템 설치
1. netdata
sudo apt -y install netdata
> netdata 디렉토리가 생김
nano /etc/netdata/netdata.conf
bind socket to IP = 0.0.0.0
> netstat -ant | grep 19999 포트 열림
> nat 포트 포워딩 19999 추가
> 192.168.0.201:19999로 들어가짐(win10)
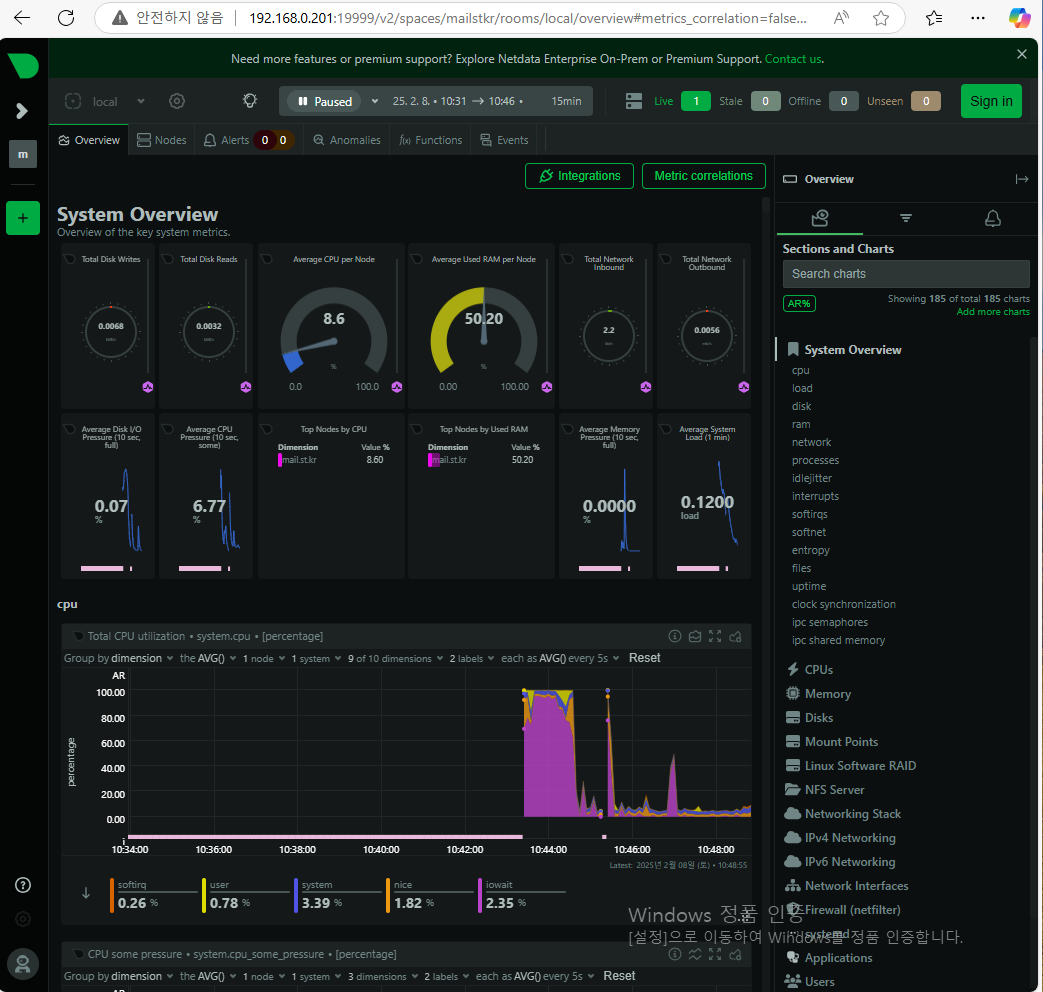
> 서버 상태를 볼 수 있음
2. 하드디스크 추가
df -h
> /dev/mapper/ubuntu--vg-ubuntu--lv > 78% 참
> 하드디스크 25GB 추가해줌
> 가상머신디스크(vmdk)
fdisk -l
fdisk /dev/sdf
n
p
엔터
엔터
엔터
w
mkfs.ext4 /dev/sdf1
vgs 로 여유공간 확인
pvcreate /dev/sdf1
y입력
vgextend /dev/ubuntu-vg /dev/sdf1
lvextend -L +25G /dev/ubuntu-vg/ubuntu-lv
resize2fs /dev/ubuntu-vg/ubuntu-lv
df -h
> 차지하는 비율이 75%에서 25%로 줄어듬
> 용량이 늘어남
3. awstats 설치
sudo apt -y install awstats
nano /etc/awstats/awstats.conf
systemctl reload apache2
a2enmod cgid
systemctl restart apache2
/usr/share/awstats/tools/update.sh
/usr/share/awstats/tools/buildstatic.sh
확인방법 > 192.168.0.201/cgi-bin/awstats.pl
st.kr 새로고침
/usr/share/awstats/tools/update.sh
/usr/share/awstats/tools/buildstatic.sh
> 로그가 업데이트 됨
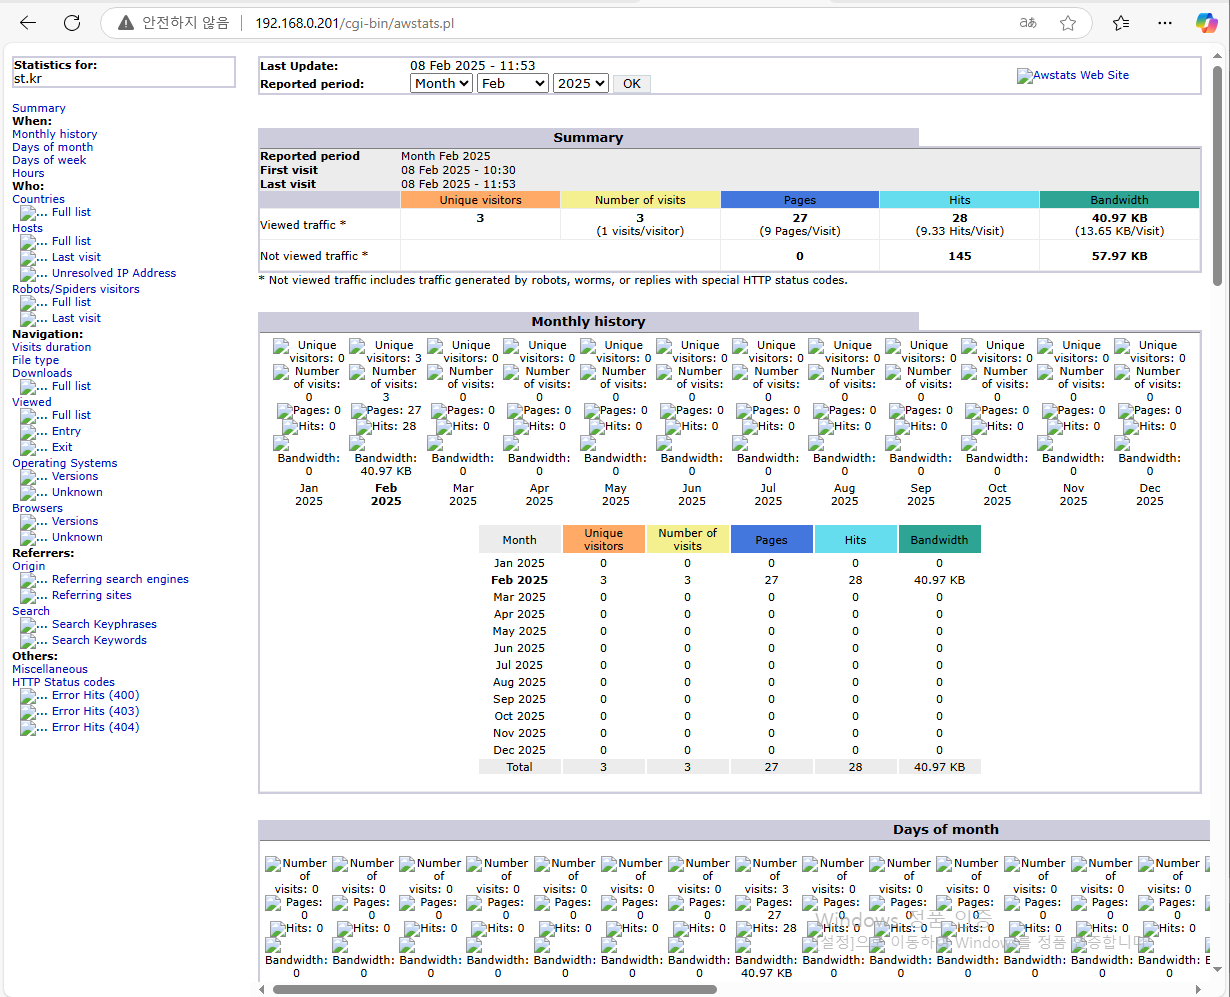
pages, Bandwidth가 늘어남
#무결성 프로그램 설치
1. tripwire 설치
(Host Based intruction Detection System) IDS
sudo apt update
sudo apt -y install tripwire
> 두개의 key를 사용(site key, local key)
> 다 yes 눌러주고 비밀번호 입력함
cd /etc/tripwire
nano twcfg.txt
> config 파일
> report level을 3으로 맞추고 메일세팅을 할 수 있다.
twadmin -m F -c tw.cfg -S site.key twcfg.txt
> 123456
> Wrote configuration file: /etc/tripwire/tw.cfg
nano twpolmake.pl
perl twpolmake.pl twpol.txt > twpol.txt.new
twadmin -m P -c tw.cfg -p tw.pol -S site.key twpol.txt.new
tripwire -m i -s -c tw.cfg
tripwire -m c -s -c /etc/tripwire/tw.cfg
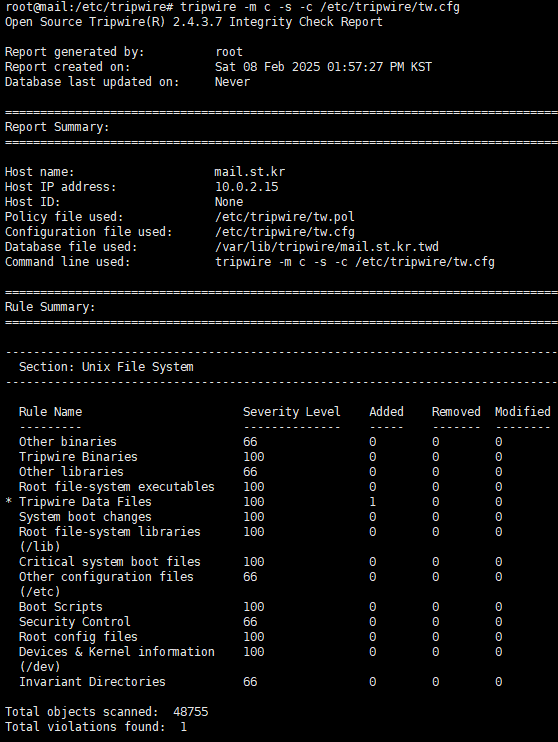
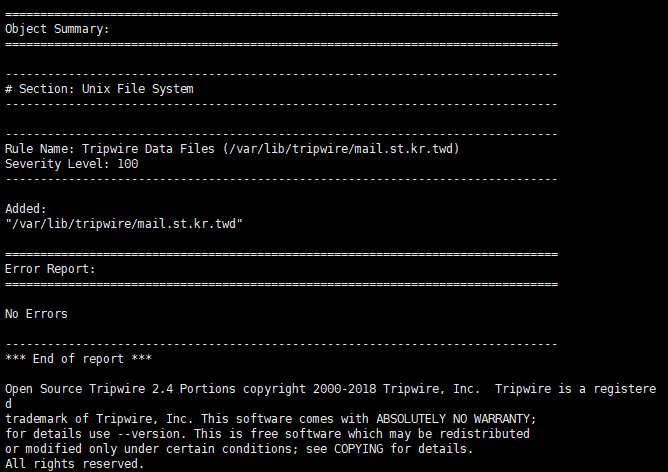
> 결과 화면이 나옴
+) 해주지 않은 명령어들
tripwire -m u -a -s -c /etc/tripwire/tw.cfg \
-r /var/lib/tripwire/report/dlp.srv.world-20181129-140452.twr
참고사이트
https://www.server-world.info/en/note?os=Ubuntu_18.04&p=tripwire
분석일지를 만들어라
#보안 프로그램 설치
http > https로 바꾸자
+) 웹방화벽 > mod_security (Web Application Firewall)
sudo apt -y install libapache2-mod-security2
sudo apt -y install roundcube roundcube-mysql
> 웹메일 보낼때 쓰는거래
1. self https : 자체 인증서
sudo apt -y install openssl
2. 공인 인증서 : 대행 업체(letsencrypt.org)
sudo apt - y install cerbot
cerbot certonly --webroot -w /home/web1/public_html
> 진짜 서버일때 쓰면됨
> 진짜 도메인이 있어야함
+)zabbix 파일 가져옴
wget https://repo.zabbix.com/zabbix/6.0/ubuntu/pool/main/z/zabbix-release/zabbix-release_6.0-3+ubuntu22.04_all.deb
dpkg -i zabbix-release_6.0-3+ubuntu22.04_all.deb
+)zabbix 파일 깔아줌
apt update
apt -y install zabbix-server-mysql zabbix-frontend-php zabbix-apache-conf zabbix-sql-scripts zabbix-agent2 php-mysql php-gd php-bcmath php-net-socket
+)다운로드 안한 프로그램들
sudo apt -y install sysstat
sudo apt -y install prometheus prometheus-node-exporter
sudo apt -y install aide
#시나리오2
1) 컴퓨터는 언제 부팅되었는가
2025-02-08 14:44
2) 사용자는 누구인가?
manager
3) 관리자는 몇번 시스템에 로그인 했는가
레지스트리 롹인
4) 해커가 정보수집을 하는 시간을 언제인가?
서버(netdata..)
5) 무슨정보를 수집하려고 했는가
> 패킷 분석하기(방화벽 네트워크 확인)
192.168.0.223
naver.com
google.com
192.168.0.201
> 관리자pc에서 naver를 치면 kali로 가게
6) 공격을 했는가
7) 공격을 했다면 무슨 흔적들이 남는가
8) 웹서버에서 파일이 업로드 되었는가
9) 관리자가 파일을 다운로드 받았는가
10) 받고 실행은 했는가
+) naver.com, google.com 검색 > st.kr
named.conf.default-zones
> naver.com 추가 > naver.com.zone을 만들자
cp db.local naver.com.zone
> 192.168.0.201을 zone에 넣자
systemctl restart apache2
systemctl restart bind9
systemctl restart named
>> 관리자PC: nslookup naver.com > 서버 도메인 모두 125.246.95.253
>> kali: nslookup naver.com > 서버: 125.246.95.253 도메인: 192.168.0.201
#웹필터링
UTM > 웹보호 >
1. 웹필터링 활성화
> 투명모드
> 인사이드(네트워크)
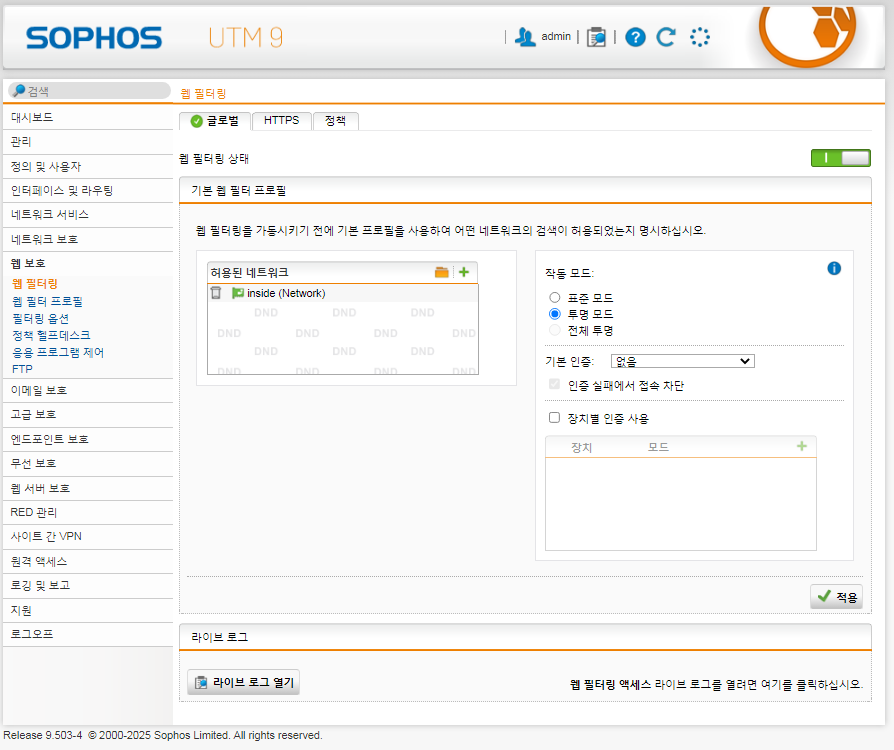
2. 웹필터프로필
> 필터동작 > 새필터동작
default content filter action > 안돼서 새필터로 만들어줌
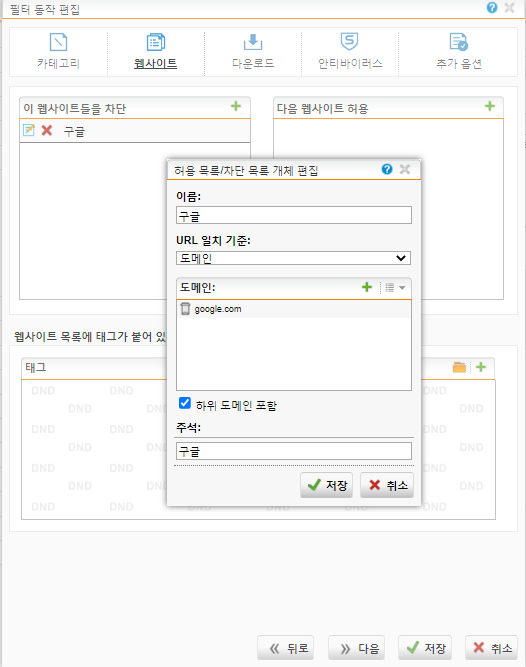
카테고리 전체 차단
도메인 추가
다운로드에서는 확장자 명을 차단할 수 있다
> naver.com/msh.exe > 다운받아지지 않는다
+) 카테고리 선택란
작업 검색 > 이직하면 안돼
#미션1. http://st.kr의 index.html을 수정하라
st.kr > /var/www/html > root
> root라 쉽게 접근이 불가능
> 서버에 접속해 직접 index.html을 만들어주자
cd /var/www/html
rm -rf index.html
nano index.html
[index.html]
<!DOCTYPE html>
<html lang="en">
 <head>
  <meta charset="UTF-8">
  <meta name="Generator" content="EditPlus®">
  <meta name="Author" content="">
  <meta name="Keywords" content="">
  <meta name="Description" content="">
  <title>document</title>
 </head>
 <body>
  1. <a href="http://web1.st.kr">web1.st.kr</a> <br>
  2. <a href="http://web2.st.kr">web2.st.kr</a> <br>
  3. <a href="http://word.st.kr">word.st.kr</a> <br>
  4. <a href="http://dvwa.st.kr">dvwa.st.kr</a> <br>
  5. <a href="http://ci4.st.kr">ci4.st.kr</a> <br>
  6. <a href="http://shop.st.kr">shop.st.kr</a> <br>
  7. <a href="http://sir.st.kr">sir.st.kr</a> <br>
 </body>
</html>
#3대서버
nat > 10.0.2.15 10.0.2.2 168.126.63.1
# 서버 모니터링 시스템 설치
1. netdata
sudo apt -y install netdata
> netdata 디렉토리가 생김
nano /etc/netdata/netdata.conf
bind socket to IP = 0.0.0.0
> netstat -ant | grep 19999 포트 열림
> nat 포트 포워딩 19999 추가
> 192.168.0.201:19999로 들어가짐(win10)
> 서버 상태를 볼 수 있음
2. 하드디스크 추가
df -h
> /dev/mapper/ubuntu--vg-ubuntu--lv > 78% 참
> 하드디스크 25GB 추가해줌
> 가상머신디스크(vmdk)
fdisk -l
fdisk /dev/sdf
n
p
엔터
엔터
엔터
w
mkfs.ext4 /dev/sdf1
vgs 로 여유공간 확인
pvcreate /dev/sdf1
y입력
vgextend /dev/ubuntu-vg /dev/sdf1
lvextend -L +25G /dev/ubuntu-vg/ubuntu-lv
resize2fs /dev/ubuntu-vg/ubuntu-lv
df -h
> 차지하는 비율이 75%에서 25%로 줄어듬
> 용량이 늘어남
3. awstats 설치
sudo apt -y install awstats
nano /etc/awstats/awstats.conf
# line 126 : set [1] if httpd log format is [combined]
# for [common], set [4]
LogFormat=1
# line 157 : set hostname
SiteDomain="st.kr"
# line 172 : set domains or IP addresses you'd like to exclude on reports
HostAliases="localhost 127.0.0.1 REGEX[^.*www\.srv\.world$]"
# create new
Alias /awstats-icon/ /usr/share/awstats/icon/
Alias /awstatsclasses/ /usr/share/java/awstats/

<Directory /usr/share/awstats>
    Options FollowSymLinks
    AllowOverride None
    # access permission for your local network
    Require ip 127.0.0.1 0.0.0.0/24
</Directory>
systemctl reload apache2
a2enmod cgid
systemctl restart apache2
/usr/share/awstats/tools/update.sh
/usr/share/awstats/tools/buildstatic.sh
확인방법 > 192.168.0.201/cgi-bin/awstats.pl
st.kr 새로고침
/usr/share/awstats/tools/update.sh
/usr/share/awstats/tools/buildstatic.sh
> 로그가 업데이트 됨
pages, Bandwidth가 늘어남
#무결성 프로그램 설치
1. tripwire 설치
(Host Based intruction Detection System) IDS
sudo apt update
sudo apt -y install tripwire
> 두개의 key를 사용(site key, local key)
> 다 yes 눌러주고 비밀번호 입력함
cd /etc/tripwire
nano twcfg.txt
> config 파일
> report level을 3으로 맞추고 메일세팅을 할 수 있다.
twadmin -m F -c tw.cfg -S site.key twcfg.txt
> 123456
> Wrote configuration file: /etc/tripwire/tw.cfg
nano twpolmake.pl
#!/usr/bin/perl
# Tripwire Policy File customize tool
# ----------------------------------------------------------------
# Copyright (C) 2003 Hiroaki Izumi
# This program is free software; you can redistribute it and/or
# modify it under the terms of the GNU General Public License
# as published by the Free Software Foundation; either version 2
# of the License, or (at your option) any later version.
# This program is distributed in the hope that it will be useful,
# but WITHOUT ANY WARRANTY; without even the implied warranty of
# MERCHANTABILITY or FITNESS FOR A PARTICULAR PURPOSE.  See the
# GNU General Public License for more details.
# You should have received a copy of the GNU General Public License
# along with this program; if not, write to the Free Software
# Foundation, Inc., 59 Temple Place - Suite 330, Boston, MA  02111-1307, USA.
# ----------------------------------------------------------------
# Usage:
#     perl twpolmake.pl {Pol file}
# ----------------------------------------------------------------
#
$POLFILE=$ARGV[0];

open(POL,"$POLFILE") or die "open error: $POLFILE" ;
my($myhost,$thost) ;
my($sharp,$tpath,$cond) ;
my($INRULE) = 0 ;

while () {
    chomp;
    if (($thost) = /^HOSTNAME\s*=\s*(.*)\s*;/) {
        $myhost = `hostname` ; chomp($myhost) ;
        if ($thost ne $myhost) {
            $_="HOSTNAME=\"$myhost\";" ;
        }
    }
    elsif ( /^{/ ) {
        $INRULE=1 ;
    }
    elsif ( /^}/ ) {
        $INRULE=0 ;
    }
    elsif ($INRULE == 1 and ($sharp,$tpath,$cond) = /^(\s*\#?\s*)(\/\S+)\b(\s+->\s+.+)$/) {
        $ret = ($sharp =~ s/\#//g) ;
        if ($tpath eq '/sbin/e2fsadm' ) {
            $cond =~ s/;\s+(tune2fs.*)$/; \#$1/ ;
        }
        if (! -s $tpath) {
            $_ = "$sharp#$tpath$cond" if ($ret == 0) ;
        }
        else {
            $_ = "$sharp$tpath$cond" ;
        }
    }
    print "$_\n" ;
}
close(POL) ;
perl twpolmake.pl twpol.txt > twpol.txt.new
twadmin -m P -c tw.cfg -p tw.pol -S site.key twpol.txt.new
tripwire -m i -s -c tw.cfg
tripwire -m c -s -c /etc/tripwire/tw.cfg
> 결과 화면이 나옴
+) 해주지 않은 명령어들
tripwire -m u -a -s -c /etc/tripwire/tw.cfg \
-r /var/lib/tripwire/report/dlp.srv.world-20181129-140452.twr
참고사이트
https://www.server-world.info/en/note?os=Ubuntu_18.04&p=tripwire
분석일지를 만들어라
#보안 프로그램 설치
http > https로 바꾸자
+) 웹방화벽 > mod_security (Web Application Firewall)
sudo apt -y install libapache2-mod-security2
sudo apt -y install roundcube roundcube-mysql
> 웹메일 보낼때 쓰는거래
1. self https : 자체 인증서
sudo apt -y install openssl
2. 공인 인증서 : 대행 업체(letsencrypt.org)
sudo apt - y install cerbot
cerbot certonly --webroot -w /home/web1/public_html
> 진짜 서버일때 쓰면됨
> 진짜 도메인이 있어야함
+)zabbix 파일 가져옴
wget https://repo.zabbix.com/zabbix/6.0/ubuntu/pool/main/z/zabbix-release/zabbix-release_6.0-3+ubuntu22.04_all.deb
dpkg -i zabbix-release_6.0-3+ubuntu22.04_all.deb
+)zabbix 파일 깔아줌
apt update
apt -y install zabbix-server-mysql zabbix-frontend-php zabbix-apache-conf zabbix-sql-scripts zabbix-agent2 php-mysql php-gd php-bcmath php-net-socket
+)다운로드 안한 프로그램들
sudo apt -y install sysstat
sudo apt -y install prometheus prometheus-node-exporter
sudo apt -y install aide
#시나리오2
1) 컴퓨터는 언제 부팅되었는가
2025-02-08 14:44
2) 사용자는 누구인가?
manager
3) 관리자는 몇번 시스템에 로그인 했는가
레지스트리 롹인
4) 해커가 정보수집을 하는 시간을 언제인가?
서버(netdata..)
5) 무슨정보를 수집하려고 했는가
> 패킷 분석하기(방화벽 네트워크 확인)
192.168.0.223
naver.com
google.com
192.168.0.201
> 관리자pc에서 naver를 치면 kali로 가게
6) 공격을 했는가
7) 공격을 했다면 무슨 흔적들이 남는가
8) 웹서버에서 파일이 업로드 되었는가
9) 관리자가 파일을 다운로드 받았는가
10) 받고 실행은 했는가
+) naver.com, google.com 검색 > st.kr
named.conf.default-zones
> naver.com 추가 > naver.com.zone을 만들자
cp db.local naver.com.zone
> 192.168.0.201을 zone에 넣자
systemctl restart apache2
systemctl restart bind9
systemctl restart named
>> 관리자PC: nslookup naver.com > 서버 도메인 모두 125.246.95.253
>> kali: nslookup naver.com > 서버: 125.246.95.253 도메인: 192.168.0.201
#웹필터링
UTM > 웹보호 >
1. 웹필터링 활성화
> 투명모드
> 인사이드(네트워크)
2. 웹필터프로필
> 필터동작 > 새필터동작
default content filter action > 안돼서 새필터로 만들어줌
카테고리 전체 차단
도메인 추가
다운로드에서는 확장자 명을 차단할 수 있다
> naver.com/msh.exe > 다운받아지지 않는다
+) 카테고리 선택란
작업 검색 > 이직하면 안돼