12일차
●12일차(20250106)
*네트워크 보안전문가로 가능 길(p4)
데이터링크 계층 ethrnet -> 맥주소
ip만큼 중요한 port -> ip안으로 들어가기 위해서는 port가 열려있어야 한다
> nat로 하려면 port 설정을 먼저 하는 이유
1. snort 설치 (nat로 놓는거 잊지말기)
우분투 버전 22.04 (최신버전은 snort가 안깔림)
sudo apt update
apt -y install snort
snort --version
> 2.9.15.1 버전
2. snort(p99)
: 실시간으로 장비를 통해 지나가는 패킷을 검사하여 악성코드 차단. 해킹 검출, 비 업무 활동 제어, HTTP/HTTPS
사이트 제어, 파일 차단 등에 활용되는 엔진으로 주로 침입탐지/방지 시스템 (IDS)의 대표적으로 사용되는 오픈소스
정책(Rule) 기반으로 운영되고 있다
3. snort 기본 정책 규칙
3-1. 네트워크 그룹 포트 그룹 설정(p124)
HOME_NET : 외부 위협으로브터 보호돼야할 ip 대역 (192.168.1.0/24)
EXTERNAL_NET :HOME_NET이 아닌 대역 (! $HOME_NET)
3-2. 기본 정책 규칙(p135)
Action Header Option
action : pass, alert, drop, reject
> alert, drop, reject 는 기록(로그)가 남는다
cd /etc/snort/rules
ls
> 룰이 나옴
룰을 빼오려면
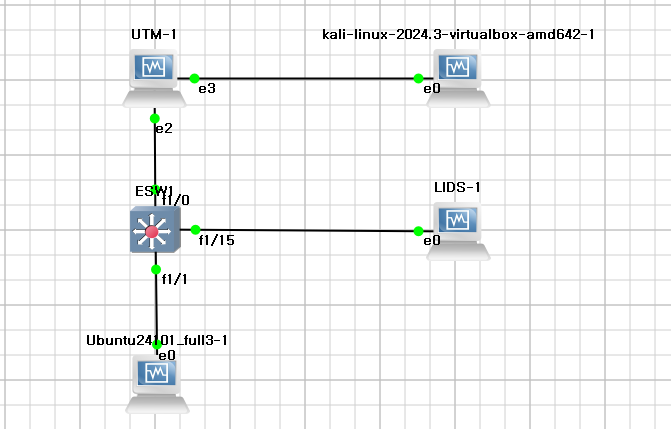
ubuntu, ids을 nat로 두고
dns를 192.168.0.99 168.126.63.1로 맞춘다
xshell로 192.168.0.201에 들어간다
sudo apt update
sudo apt -y install lrzsz
sz *.rules
kali 서버에서 핑도 잘가고 3대서버가 잘 작동해야함
ping 10.0.2.15
nslooup st.kr
nslooup intra.st.kr
nslooup mail.st.kr
ids로 들어가서
#hping3 10.0.2.15 -a 10.0.2.15 --icmp
tcp dump -i enp0s3 -e icmp
kali에서 ping 10.0.2.15를 해주면
> 해커에서 ids로 들어오는게 확인된다
nano /etc/snort/snort.conf
#include $RULES_PATH/local_rules 만 놔두고
다른 include 다 주석처리
> local룰만 작동될 수 있도록
cd /etc/snort
snort -A console -q -u snort -g snort -c /etc/snort/snort.conf
> 파일에 내용이 없다고 함
cd/etc/snort/rules
nano local.rules
alert icmp any any -> any any (msg:"DetectToIcmp"; sid:1000001;)
넣어주고
cd /etc/snort
snort -A console -q -u snort -g snort -c /etc/snort/snort.conf
> 내가 써준 icmp any any -> any any (msg:"DetectToIcmp"; sid:1000001;) 이게 반응하게 된다
-> 네트워크 공격
랜드공격: 출발지 IP주소를 목적지 IP주소와 동일하게 설정
ICMP 플러딩 공격
> 공격을 kali에서
공격
hping3 10.0.2.15 --icmp --flood
탐지
alert icmp any any -> any any (msg:"PingOfDeath";threshold:type both,track by_src,count 10,seconds 2,sid:1000002;)
2초 동안 10회 이상의 ICMP요청이 발생한다면 죽음의 핑 공격으로 판단하겠다
공격
nmap 10.0.2.15 -p 22 -sT
탐지
alert tcp any any -> 10.0.2.15 22 (msg:"nmapScan";flags:S;sid:1000003;)
공격
ssh master@10.0.2.15
탐지
alert tcp any any -> 10.0.2.15 22 (msg:"sshAttack";content:"SSH";nocase;sid:1000004;)
nocase : 대소문자를 구별하지 않겠다.
content:"";nocase랑 쌍으로 사용함
공격 hydra -L user.txt -P pass.txt -f 10.0.2.15 ssh
hydra -L user.txt -P passwd.txt -f 10.0.2.15 ftp ->?
hydra -L user.txt -P pass.txt -f 10.0.2.15 http-post-form "/login_chk.php:id=^USER^&pw=^PASS^:fail" -V -> ?
slowhttptest -H -g -o slowloris -c 4000 -r 100 -i 10 -t GET -p 3 -x 3 -u http://10.0.2.15 -> ?
탐지
alert tcp any any -> 10.0.2.15 21 (msg:"ftpAttack";content:"USER root";nocase;sid:1000005;)
alert tcp any any -> 10.0.2.15 22 (msg:"sshBruteForceAttack";content:"SSH";nocase;offset:0;depth:4;sid:1000006;)
alert tcp any any -> 10.0.2.15 80 (msg:"httpBruteForceAttack";content:"GET / HTTP/1.";nocase;offset:0;depth:4;sid:1000006;)
alert tcp any any -> 10.0.2.15 80 (msg:"ToDetectSlowlowLorisAttack";flow:to_server,established;pcre:"/[^\x0d\x0a]\x0d\0a$/";threshold:type both,track by_src,count 10,seconds 2;sid:1000007;)
pcre : (Perl Compatible Regular Expressions ) : 펄 호환 정규 표현식
offset/depth는 지정한 위치에서 문자열 검색을 하기 위함
ids에 apm 설치
스노트 로그 mysql에 저장하기
apt update
apt -y install snort
xshell
cd /etc/snort/rules
cd /var/log/snort
cat snort.log
cat snort.alert
>로그들 다찍혀있음
반야드2 프로그램 설치 (이 방식이 안됨)
sudo apt update
sudo apt-get install -y mysql-server libmysqlclient-dev mysql-client autoconf libtool
apt -y intall build-essential
apt -y install libpcap-dev libpcre3-dev
apt -y install mysql-server libmysqlclient-dev mysql-client autoconf libtool
apt -y install bison flex
cd ~
mkdir snort_source
cd /usr/src
wget https://snort.org/downloads/snort/daq-2.0.6.str.gz
rz -E
tar -xvzf daq-2.0.7.tar.gz
cd daq-2.07
./configure && make && make install
cd ~
touch /etc/snort/sid-msg.map
cat /etc/snort/snort.conf -n | egrep "output unfiled2"
>550과 551 라인 확인 가능함
cd snort_source
wget https://github.com/firnsy/barnyard2/archive/master.tar.gz
tar -zxvf master.tar.gz
cd barnyard2-master
autoreconf -fvi -I ./m4
ln -s /usr/include/dumbnet.h /usr/include.dnet.h
sudo idconfig
getconf LONG_BIT
64비트임을 알려줌
./configure --with-mysql --with-mysql-libralies=/usr/lib/x86_64-linux-gnu
make && make install or make
sudo make install
cd
/usr/local/bin/barnyard2 -V
> 이 경로에 barnyard2가 만들어지지 않음
#반야드2 최종 설치 메뉴얼
[1단계]
apt update
apt -y install snort
apt -y install lrzsz
apt -y install net-tools
apt update
apt upgrade
reboot
[2단계]
반야드2 프로그램 설치
apt -y install build-essential
apt -y install libpcap-dev libpcre3-dev libdumbnet-dev
apt -y install mysql-server libmysqlclient-dev mysql-client autoconf libtool
apt -y install bison flex
mysql
CREATE DATABASE snort;
CREATE USER 'snort'@'localhost' IDENTIFIED BY 'root';
GRANT ALL PRIVILEGES ON snort.* TO 'snort'@'localhost';
FLUSH PRIVILEGES;
exit
cd /usr/src
sudo git clone https://github.com/firnsy/barnyard2 barnyard_src
#파일 로컬에서 서버로 옮기기
wget https://snort.org/downloads/snort/daq-2.0.7.tar.gz
tar -xvzf daq-2.0.7.tar.gz
cd daq-2.0.7
./configure && make && make install
>warning은 보이나 설치 가능
touch /etc/snort/sid-msg.map
cat /etc/snort/snort.conf -n | egrep "output unified2"
>550과 551 라인 확인 가능함
cd ..
cd barnyard_src
autoreconf -fvi -I ./m4
> 파일이 생성됨
ln -s /usr/include/dumbnet.h /usr/include/dnet.h
ldconfig
getconf LONG_BIT
64 비트임을 알려줌
#파일 수정
cd src/output-plugins
nano spo_alert_fwsam.c
중간에 typedef int socket 지움
nano spo_database.h
my_bool -> bool
cd ..
cd ..
./configure --with-mysql --with-mysql-libraries=/usr/lib/x86_64-linux-gnu
make && make install
make 와 make install를 한번에 할 수 있다.
#설치확인
barnyard2 -V
>
______ -*> Barnyard2 <*-
/ ,,_ \ Version 2.1.14 (Build 337)
|o" )~| By Ian Firns (SecurixLive): http://www.securixlive.com/
+ '''' + (C) Copyright 2008-2013 Ian Firns <firnsy@securixlive.com>
cp /usr/src/barnyard_src/etc/barnyard2.conf /etc/snort/
mkdir /var/log/barnyard2
chmod 666 /var/log/barnyard2
touch /var/log/snort/barnyard2.waldo
chown snort.snort /var/log/snort/barnyard2.waldo
cd /usr/src/barnyard_src/schemas
mysql -p < create_mysql snort
nano /etc/snort/barnyard2.conf
output database: log, mysql, user=snort password=root dbname=snort host=localhost
sudo chmod o-r /etc/snort/barnyard2.conf
Testing
sudo /usr/local/bin/snort -q -u snort -g snort -c /etc/snort/snort.conf -i enp0s3
sudo barnyard2 -c /etc/snort/barnyard2.conf -d /var/log/snort -f snort.u2 -w /var/log/snort/barnyard2.bookmark -g snort -u snort
mysql -u snort -p snort
select count(*) from envent;
*네트워크 보안전문가로 가능 길(p4)
데이터링크 계층 ethrnet -> 맥주소
ip만큼 중요한 port -> ip안으로 들어가기 위해서는 port가 열려있어야 한다
> nat로 하려면 port 설정을 먼저 하는 이유
1. snort 설치 (nat로 놓는거 잊지말기)
우분투 버전 22.04 (최신버전은 snort가 안깔림)
sudo apt update
apt -y install snort
snort --version
> 2.9.15.1 버전
2. snort(p99)
: 실시간으로 장비를 통해 지나가는 패킷을 검사하여 악성코드 차단. 해킹 검출, 비 업무 활동 제어, HTTP/HTTPS
사이트 제어, 파일 차단 등에 활용되는 엔진으로 주로 침입탐지/방지 시스템 (IDS)의 대표적으로 사용되는 오픈소스
정책(Rule) 기반으로 운영되고 있다
3. snort 기본 정책 규칙
3-1. 네트워크 그룹 포트 그룹 설정(p124)
HOME_NET : 외부 위협으로브터 보호돼야할 ip 대역 (192.168.1.0/24)
EXTERNAL_NET :HOME_NET이 아닌 대역 (! $HOME_NET)
3-2. 기본 정책 규칙(p135)
Action Header Option
action : pass, alert, drop, reject
> alert, drop, reject 는 기록(로그)가 남는다
cd /etc/snort/rules
ls
> 룰이 나옴
룰을 빼오려면
ubuntu, ids을 nat로 두고
dns를 192.168.0.99 168.126.63.1로 맞춘다
xshell로 192.168.0.201에 들어간다
sudo apt update
sudo apt -y install lrzsz
sz *.rules
kali 서버에서 핑도 잘가고 3대서버가 잘 작동해야함
ping 10.0.2.15
nslooup st.kr
nslooup intra.st.kr
nslooup mail.st.kr
ids로 들어가서
#hping3 10.0.2.15 -a 10.0.2.15 --icmp
tcp dump -i enp0s3 -e icmp
kali에서 ping 10.0.2.15를 해주면
> 해커에서 ids로 들어오는게 확인된다
nano /etc/snort/snort.conf
#include $RULES_PATH/local_rules 만 놔두고
다른 include 다 주석처리
> local룰만 작동될 수 있도록
cd /etc/snort
snort -A console -q -u snort -g snort -c /etc/snort/snort.conf
> 파일에 내용이 없다고 함
cd/etc/snort/rules
nano local.rules
alert icmp any any -> any any (msg:"DetectToIcmp"; sid:1000001;)
넣어주고
cd /etc/snort
snort -A console -q -u snort -g snort -c /etc/snort/snort.conf
> 내가 써준 icmp any any -> any any (msg:"DetectToIcmp"; sid:1000001;) 이게 반응하게 된다
-> 네트워크 공격
랜드공격: 출발지 IP주소를 목적지 IP주소와 동일하게 설정
ICMP 플러딩 공격
> 공격을 kali에서
공격
hping3 10.0.2.15 --icmp --flood
탐지
alert icmp any any -> any any (msg:"PingOfDeath";threshold:type both,track by_src,count 10,seconds 2,sid:1000002;)
2초 동안 10회 이상의 ICMP요청이 발생한다면 죽음의 핑 공격으로 판단하겠다
공격
nmap 10.0.2.15 -p 22 -sT
탐지
alert tcp any any -> 10.0.2.15 22 (msg:"nmapScan";flags:S;sid:1000003;)
공격
ssh master@10.0.2.15
탐지
alert tcp any any -> 10.0.2.15 22 (msg:"sshAttack";content:"SSH";nocase;sid:1000004;)
nocase : 대소문자를 구별하지 않겠다.
content:"";nocase랑 쌍으로 사용함
공격 hydra -L user.txt -P pass.txt -f 10.0.2.15 ssh
hydra -L user.txt -P passwd.txt -f 10.0.2.15 ftp ->?
hydra -L user.txt -P pass.txt -f 10.0.2.15 http-post-form "/login_chk.php:id=^USER^&pw=^PASS^:fail" -V -> ?
slowhttptest -H -g -o slowloris -c 4000 -r 100 -i 10 -t GET -p 3 -x 3 -u http://10.0.2.15 -> ?
탐지
alert tcp any any -> 10.0.2.15 21 (msg:"ftpAttack";content:"USER root";nocase;sid:1000005;)
alert tcp any any -> 10.0.2.15 22 (msg:"sshBruteForceAttack";content:"SSH";nocase;offset:0;depth:4;sid:1000006;)
alert tcp any any -> 10.0.2.15 80 (msg:"httpBruteForceAttack";content:"GET / HTTP/1.";nocase;offset:0;depth:4;sid:1000006;)
alert tcp any any -> 10.0.2.15 80 (msg:"ToDetectSlowlowLorisAttack";flow:to_server,established;pcre:"/[^\x0d\x0a]\x0d\0a$/";threshold:type both,track by_src,count 10,seconds 2;sid:1000007;)
pcre : (Perl Compatible Regular Expressions ) : 펄 호환 정규 표현식
offset/depth는 지정한 위치에서 문자열 검색을 하기 위함
ids에 apm 설치
스노트 로그 mysql에 저장하기
apt update
apt -y install snort
xshell
cd /etc/snort/rules
cd /var/log/snort
cat snort.log
cat snort.alert
>로그들 다찍혀있음
반야드2 프로그램 설치 (이 방식이 안됨)
sudo apt update
sudo apt-get install -y mysql-server libmysqlclient-dev mysql-client autoconf libtool
apt -y intall build-essential
apt -y install libpcap-dev libpcre3-dev
apt -y install mysql-server libmysqlclient-dev mysql-client autoconf libtool
apt -y install bison flex
cd ~
mkdir snort_source
cd /usr/src
wget https://snort.org/downloads/snort/daq-2.0.6.str.gz
rz -E
tar -xvzf daq-2.0.7.tar.gz
cd daq-2.07
./configure && make && make install
cd ~
touch /etc/snort/sid-msg.map
cat /etc/snort/snort.conf -n | egrep "output unfiled2"
>550과 551 라인 확인 가능함
cd snort_source
wget https://github.com/firnsy/barnyard2/archive/master.tar.gz
tar -zxvf master.tar.gz
cd barnyard2-master
autoreconf -fvi -I ./m4
ln -s /usr/include/dumbnet.h /usr/include.dnet.h
sudo idconfig
getconf LONG_BIT
64비트임을 알려줌
./configure --with-mysql --with-mysql-libralies=/usr/lib/x86_64-linux-gnu
make && make install or make
sudo make install
cd
/usr/local/bin/barnyard2 -V
> 이 경로에 barnyard2가 만들어지지 않음
#반야드2 최종 설치 메뉴얼
[1단계]
apt update
apt -y install snort
apt -y install lrzsz
apt -y install net-tools
apt update
apt upgrade
reboot
[2단계]
반야드2 프로그램 설치
apt -y install build-essential
apt -y install libpcap-dev libpcre3-dev libdumbnet-dev
apt -y install mysql-server libmysqlclient-dev mysql-client autoconf libtool
apt -y install bison flex
mysql
CREATE DATABASE snort;
CREATE USER 'snort'@'localhost' IDENTIFIED BY 'root';
GRANT ALL PRIVILEGES ON snort.* TO 'snort'@'localhost';
FLUSH PRIVILEGES;
exit
cd /usr/src
sudo git clone https://github.com/firnsy/barnyard2 barnyard_src
#파일 로컬에서 서버로 옮기기
wget https://snort.org/downloads/snort/daq-2.0.7.tar.gz
tar -xvzf daq-2.0.7.tar.gz
cd daq-2.0.7
./configure && make && make install
>warning은 보이나 설치 가능
touch /etc/snort/sid-msg.map
cat /etc/snort/snort.conf -n | egrep "output unified2"
>550과 551 라인 확인 가능함
cd ..
cd barnyard_src
autoreconf -fvi -I ./m4
> 파일이 생성됨
ln -s /usr/include/dumbnet.h /usr/include/dnet.h
ldconfig
getconf LONG_BIT
64 비트임을 알려줌
#파일 수정
cd src/output-plugins
nano spo_alert_fwsam.c
중간에 typedef int socket 지움
nano spo_database.h
my_bool -> bool
cd ..
cd ..
./configure --with-mysql --with-mysql-libraries=/usr/lib/x86_64-linux-gnu
make && make install
make 와 make install를 한번에 할 수 있다.
#설치확인
barnyard2 -V
>
______ -*> Barnyard2 <*-
/ ,,_ \ Version 2.1.14 (Build 337)
|o" )~| By Ian Firns (SecurixLive): http://www.securixlive.com/
+ '''' + (C) Copyright 2008-2013 Ian Firns <firnsy@securixlive.com>
cp /usr/src/barnyard_src/etc/barnyard2.conf /etc/snort/
mkdir /var/log/barnyard2
chmod 666 /var/log/barnyard2
touch /var/log/snort/barnyard2.waldo
chown snort.snort /var/log/snort/barnyard2.waldo
cd /usr/src/barnyard_src/schemas
mysql -p < create_mysql snort
nano /etc/snort/barnyard2.conf
output database: log, mysql, user=snort password=root dbname=snort host=localhost
sudo chmod o-r /etc/snort/barnyard2.conf
Testing
sudo /usr/local/bin/snort -q -u snort -g snort -c /etc/snort/snort.conf -i enp0s3
sudo barnyard2 -c /etc/snort/barnyard2.conf -d /var/log/snort -f snort.u2 -w /var/log/snort/barnyard2.bookmark -g snort -u snort
mysql -u snort -p snort
select count(*) from envent;